
Rain Gauge
HRS10 Rain Gauge
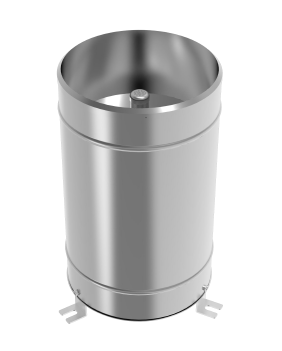
This instrument is a primary instrument for measuring precipitation. Its performance complies with the national standard GB/T 21978.2-2014 “Requirements for Precipitation Observation.”
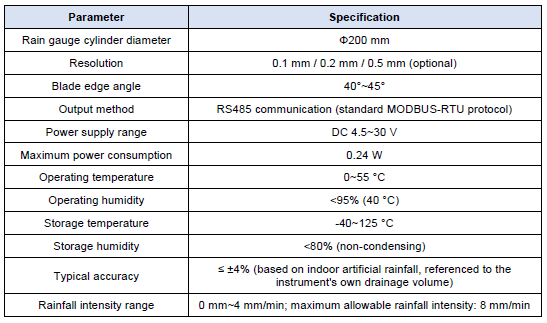
The core component of this instrument, the tipping bucket, adopts a three-dimensional streamlined design and is made entirely of stainless steel, allowing the bucket to tip water more smoothly. It also has self-cleaning (dust-shedding) properties and is easy to clean. The instrument outputs a pulse signal converted to RS485, allowing rainfall to be read directly without any secondary calculation, making it simple and convenient to use.
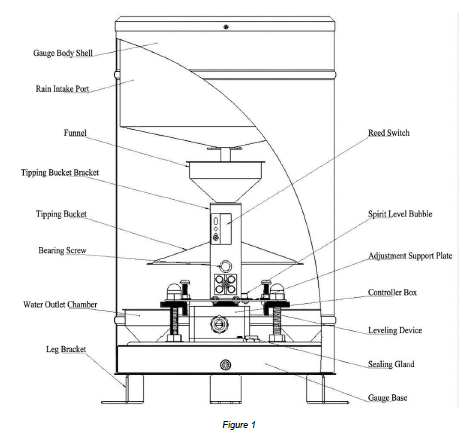
As shown in Figure 1, this instrument consists of a rain gauge housing, rain-collecting orifice, funnel, tipping-bucket support, tipping bucket, bearing screws, water outlet chamber, sealed connector, reed switch tube, bubble level, adjustment support plate, control box, leveling device, terminal blocks, leg supports, and rain gauge base. The base is fitted with the tipping-bucket shaft, a circular bubble level, the reed-switch-tube bracket, and the signal output terminals. Unlike other tipping-bucket rain gauges, this instrument’s tipping-bucket shaft sleeve is an integrated positioning structure; the bucket is mounted in the bearing via the shaft. The internal structure is fully assembled at the factory, so no on- site assembly of internal components is required, which makes field installation more convenient.
The tipping bucket of this instrument uses a three-dimensional streamlined design with a drooping curved-surface flow-guiding tip, giving it an attractive, smooth appearance, better water-tipping performance, and easier cleaning and maintenance.
A permanent magnet is mounted on the tipping bucket, and a reed switch (reed tube) is mounted on its bracket. At the factory, the magnet and reed switch are adjusted to an appropriate coupling distance, ensuring a defined proportional relationship between the instrument’s output signal and the number of bucket tips.
At the factory, the tipping-bucket tilt-adjustment screw has already been locked at the optimum tilt- angle set point, and the tilt screw has been sealed with a dab of red paint. When installing the instrument on site, the user only needs to adjust the overall instrument so that the bubble level is centered, as required in this manual, before putting it into use — there is no need to re-adjust the bucket tilt angle on site.
Let’s Connect
Need assistance? Get in touch with our team.